Nursery!!!

Tags

, , , , , , ,

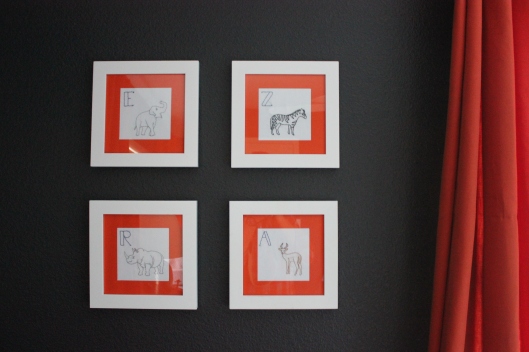
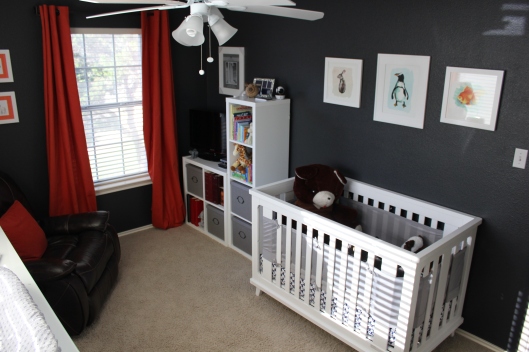
You can tell me that nurseries don’t need to be ready for babies right away, but let’s face it people I’m too much of a planner for that and quite honestly I needed this project to be done. So I’m not knocking anyone who had their nursery done later or way in advance. For us, it had to be done before he got here.

Over the last 3-6 months we’ve been accumulating things for the nursery. Progressively making trips to IKEA. Once for an 8-drawer Hemnes dresser with organizer inserts, a second time for Kallax bookshelves and a third for some Miriam curtains. Then there was the trip to Home Depot for paint once we finally settled on a color scheme (and also for ceiling paint) which took 3-4 months in itself. Painting the room, ceiling and closet. Then we bought the artwork from minted.com which took a while to get a good sale and free shipping promotions. Finally, there were several showers where people just were so gracious and generous to give us monetary gifts and other must-have items that were absolutely needed for the nursery and the baby. We were so incredibly blessed by our friends and family and want to thank them so very much. Everything they provided for us helped us get this project done and also just set us up to be ready to receive this sweet baby boy of ours!
IMG_4980

IMG_4997

Pantry Project!

Our pantry has been so full and in need of a paint job. Honestly it’s needed a more organized system. We checked to see if a organizational system would work in there but the opinion we got was that the system wouldn’t give us much more room to work with than what we already have. So we decided to work with what we had, eliminate some of the existing shelves, store items in Ball jars, and buy a bucket of white paint for the walls.

This was a fun project and really really inexpensive. We used 95% of materials we already had in the house! We finally have a walk in pantry!

Before

IMG_4823After

IMG_4844

Side Flower Bed Redo

My mom had a beautiful rose garden on the side of the house but the maintenance and up-keep just got to be too much and the side flower bed was overrun with weeds. Over the last couple of years Josh and I started pulling up the roses to give the flower bed a more minimalistic approach. Here’s what we ended up with!

Sorry there’s no before picture this time around! 🙂

IMG_4177 IMG_4227

Deck Painting & Board Replacement

The deck has needed some attention for a while. We’ve been looking at replacing it, but that just wasn’t possible this year. So we decided to replace the boards that required the most attention and give the whole thing a coat of paint. We used Behr Deck Restore which is a heartier than normal exterior paints. It should extend the life of the deck before we have to replace it entirely.

Before

Deck Before 1

Deck Before 2

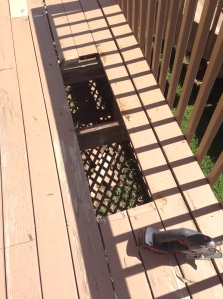
During the Board replacement process Josh used a jigsaw to loosen the rotten boards and then created cleats on either side of the joists supporting the new pieces of wood.

Deck Before 4

 Deck Before 5After

Deck After 2

Deck After 1


Lighting Upgrades!

Even though I haven’t blogged we have been working on the house! 

With the long weekend last weekend I realized I was WAY behind blogging about what we’ve done, so prepare to be bombarded by blog posts!

The lighting has been something we’ve been waiting to upgrade because it can be accomplished in between larger projects and it’s something we can do ourselves.

Breakfast Area

First we have the breakfast area. We updated this fixture when Josh found an amazing sale price on a CB2 fixture. We realized we’d received a defective fixture when we hung it and phoned CB2. I have never had such an easy time returning something and ordering a new fixture. Not only did they order us a new one, but they didn’t charge us for it and sent us a label to send the defective one back. Really great customer service and really happy with the way this light looks in that space!

Before

Breakfast Nook Before

After

Breakfast Nook 1

Breakfast Nook 2

Kitchen Lighting

Our DIY skills only go so far. We were able to hang the fixture over the sink, but over the island, we knew that we would need an electrician. Originally the house plans had accounted for a longer side on the island to allow for a small bar seat. Because of this, the light fixture placement was centered based on the longer countertop plan. However my parents, chose to have a centered countertop and when we added the granite in the kitchen, we also chose to have it centered without a longer bar seat. This means that the fixture never really hung centered over the island. Fortunately, this was an easy fix for an electrician!

Before

 Kitchen Lights Before

After

Kitchen Light 2

Kitchen Light 1


Sorry … It’s been a while!

Well … not too many projects going on in the Graham house lately! We’re painting the deck but it’s been slow going since we haven’t had much good weather. Rainy weekends make for poor painting conditions. In the meantime though we’re just been having fun and enjoying life together with the fur baby!

Just wanted to check in and let the world know we’re still here and doing great!

Water Closet Makeover

This little room has needed some attention for quite some time. We have a small water closet in our master bath that houses our toilet. Over the last year and a half in our house this little space easily became cluttered.

It is such a small space I had to take a few pictures to capture the before state of the room.

Before 3 Before 2 Before 1

  • On the left side of the room we removed the towel bars and bought hooks to hang our towels in the main area of the bathroom.
  • Once the bars were removed I patched the holes with spackle.
  • In the center we ditched the plastic bins and moved them to a hall closet.
  • We also decided to paint the cubbies an accent color to give it a different look.
  • The small shelf in the corner was moved out of the room.
  • We also invested in a small sliding drawer shelf from the container store for nicer looking storage.
  • Last but not least, the shelving on the right side of the room, above the toilet. We really wanted wood shelving in this space. 

15c527fe9b063bb45f999b59953f80e2I had originally contemplated staining some butcher block, but it was a little too expensive for a small water closet shelf that only 2 people were going to look at.

So, what do you use to brainstorm?

Massive amounts of time on Pinterest and Houzz.

Highly recommend these sites if you don’t use them.

We found this gem and drew inspiration from this design, but added our own touches.

For instance, we wanted the shelves to be a thicker wood. Knotted with character. We bought some really nice 2×12 at Home Depot and had them cut it down to what we needed.

Total wood cost: $25.

We sanded it down, stained and sealed it over the course of a few days.
(Minwax Dark Walnut Stain)

            Shelf Prep 1    Shelf Prep 2

Pulled the wire shelving down and found out we could reuse the existing holes. There were a few that we didn’t need so we patched the extra holes with more spackle.There was some trouble with the drywall anchors and so we headed to Home Depot to find some heavy duty replacements. Once that was sorted out we started the painting process. We reused the dark blue from the office as the accent color for the cubbies.

Paint Part 2

Pulled the wire shelving down and found out we could reuse the existing holes.

There were a few that we didn’t need so we patched the extra holes with more spackle.

There was some trouble with the drywall anchors and so we headed to Home Depot to find some heavy duty replacements.

Once that was sorted out we started the painting process. We reused the dark blue from the office as the accent color for the cubbies.

When the paint was dry we added the brackets for the shelving, hung the shelves and put the finishing touches on the room’s decor! Voila! Project complete!

After 1

After 2

Game Room Redo

Tags

, ,

Ever paint a room and not like the color? I have! I ran into this issue with our game room. It is one of the largest rooms in our house and Josh and I painted it together around the middle of last year. We were hoping for it to have the look of the blue used in the Modern Family house. At the time, we didn’t know that Home Depot can look up any paint distributor’s paint color code and match it for you. So we picked a blue we thought would be close. It just ended up being brighter than planned.

Modern Family Home
(Benjamin Moore: Labrador Blue)

Modern Family

Before

Game Room Before

After the First Paint Job

Game Room1

I just wasn’t happy with the color. So much so that I didn’t post anything on the blog because I was so unhappy with it. Josh liked the color, but was so sweet and said we could repaint it. When Christmas vacation was approaching, I decided I’d spare Josh from having to paint the room again and that I’d paint it in stages since it’s so large. I did half on one day and half on the second.

First Paint Job

Game Room2

Second Paint Job
(Behr Color Match of Benjamin Moore’s Labrador Blue)

Game Room3

Here’s a better picture with more daylight that really shows off the color.

Game Room6

And a picture of the other side of the room …

Game Room7

I am so much happier with the color! It may not be that noticeable with the lack of natural light in the photos but it makes a huge difference even if we’re the only ones who can tell! 🙂

More about this room …

  • The coffee tables were my maternal grandmother’s. My parents gifted them to us when they sold us the house. The  summer we moved into the house, my paternal grandma helped me sand and refinish the tables. Such a nice keepsake!
  • The stereo has been around since I was a kid. Josh an I bought a refurb AirPort Express and we use it to play our tunes. It’s a great system!
  • The room theme is travel! We have pictures of our trips and Josh’s collection of currency framed.

End of the Year Projects

Tags

, , , , , , , , , ,

Lots of big projects going on at the Graham house these last 2 weeks. As we get ready for the holidays and our upcoming vacation we’ve been squeezing in all those projects we wanted to tackle before the year comes to a close. I’m sure we’ll sneak in one or two more before 2013 is over and done with so stay tuned here for more adventures!

2 weekends ago we took it easy and replaced our front door’s light fixture. Here’s a quick before and after in one photo.

Image

Last week we had Texas Stone Masons (Scott Bonniwell – texasstonemasons@hotmail.com/512-461-0683) come out and transform our fireplace. They did a fantastic job and the guys were incredibly patient and thoughtful about stone placement and color choice. All great characteristics in home renovation contractors. We would totally recommend them if you’re looking at having work done that requires a stone mason.

Before

Image

After

Fireplace 2

Photo credit to Josh Graham for this great picture!

Fireplace 3

Image

And this weekend we probably overdid it, but we are so so so happy with our new office space. The other room we were using worked well but it wasn’t quite big enough and (we came to find out) we couldn’t put a ceiling fan in the old room without hiring an electrician first. That meant the room was warm and could get pretty stuffy whenever we had to work from home. So we created a new space using the old formal dining room. The formal living will eventually become the formal dining space and will be the last room to paint. It will also be the only room we pay for anyone else to paint due to safety concerns because of the height of the ceiling.

But I digress. Back to the new office space. Everything in our new office was either, free, a craigslist deal, on sale or just reused from furniture we’ve had for a while. Only 1 throw pillow and our ceiling fan was full price in this project if that tells you anything about how thrifty it was.

One more thing and I’ll show the pictures. This room used to just have a lamp and our treadmill in it with a large chandelier in the center of the room. The before picture doesn’t quite do it justice of how far it’s come, regardless you’ll have to settle for a picture with the desk and color samples on the wall 🙂

Before

Office 1

After

Office 3

Office 4

Office 5

Design a site like this with WordPress.com
Get started